This article via http://permaculture.org.au/2012/08/04/how-to-germinate-your-seeds/
Germinating Your Seeds is Fun and Easy.
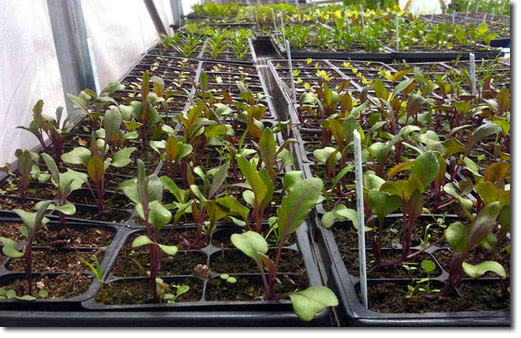
Methods vary by plant type. Seeds of annual plants have a shallow dormancy and do not need a winter to germinate, they only live one season. Annuals generally are buried to a depth equal to the size of the seed in moist well drained soil. Some, like tomatoes and peppers, require warm soil or a heat mat to germinate.
Perennial Seeds Need a Winter
Long-lived perennial plant seeds have mechanisms to prevent germination until conditions are right for successful growing. Perennial seeds go dormant over the winter and then need their dormancy broken in the spring. The techniques below are for perennial seeds only, do not use these techniques on annual or bi-annual vegetable, herb or flower seeds.
In the wild, dormancy is broken by spending time in the ground through the winter so that its hard seed coat is softened by frost and weathering. This cold moist period triggers the seed’s embryo to grow and eventually break though the softened seed coat in its search for the sun and nutrients.
Scarification
Some seeds require scratching or nicking the hard seed coat to allow moisture to enter the seed to begin germination. This mimics natures weathering or the gnawing of rodents. Medium to larger seeds can be nicked with a knife, filed or rubbed with sandpaper. Rub smaller seeds between sandpaper or emery paper. Hobby rock tumblers can be used to scarify larger seed volumes. Abrade only the outer coating, embryos should not be cracked or damaged to remain viable. Commercial nurseries scarify using solutions of sulfuric acid.
Hot water scarification is somewhat easier. Place seeds in an almost boiling pot of water at about 180°F (82°C). Allow the seeds to soak until the water cools to room temperature. Remove the seeds and sow, scarified seeds do not store well. Toss the seeds that float if viable seeds sink for that variety.
Some seeds have a double dormancy requiring both scarification first followed by cold stratification. Others such as Black Cohosh require both warm and cold stratification. See a varieties’ growing instructions for its scarification and stratification requirements.
Cold Stratification
There are six methods of stratification: cold water soaking, refrigeration, fall sowing, winter solstice sowing, outdoor treatment, and snow planting. Time to stratify seeds varies by species, though in most cases storing damp seeds at 39 to 40°F (4 to 5°C) for two to three months is sufficient. Try different methods. Split your seed packet between different methods, start dates or stratification lengths.
Cold Water Soaking
This method works best for medium and larger seeds a few weeks before last frost. You are trying to imitate snowmelt. Place seeds in a small jar and fill with cold water. Viable seeds should sink, although this is not true for all seeds. Many flat seeds or seeds with edges float. Change water daily, your are trying to wash germination inhibitors in the seed. Sow after two weeks. You can also try putting seeds in a small muslin bag and suspending them in the toilet tank. What could be easier, automatic rinsing.
Refrigeration
Wet extra strong paper towel with liquid kelp solution and ring out, fold in half. Liquid kelp is not necessary but it helps germination. Place seeds on half and fold again, press gently between your hands to get seeds in contact with the towel. Place inside plastic bag. Avoid thick walled freezer bags, they do not breath. Label with variety and date. Store in the refrigerator for two to three months depending on the variety. Check for moisture and rotting periodically. If seeds get brown spots and smell musty, they are rotting and should be tossed. Plant after three months whether germinated or not.
The advantage of the paper towel method is that you can see if the seeds are germinating. If germinated, cut paper towel and place on soil, keep moist. You can place seeds in bagged flats in sterile planting medium but the flats or pots take up more room in your refrigerator.
Fall Sowing
Direct sowing in the garden or pots in autumn is the traditional method in Europe. This method naturally exposes perennial seeds to winter conditions. Be sure to stake where you sow, and date. Wood popsicle sticks fade and rot over the winter. Use larger stakes — plastic stakes written with a black Sharpie last the longest. Plant at a depth appropriate for the variety. For seeds requiring light to germinate, just press on the surface.
Winter Solstice Sowing
A variation of autumn sowing is planting later in the winter, starting with the winter solstice on up to February. This method takes full advantage of winter cold and spring heaving and the growing energy of the earth as days lengthen. This works well for hard to start seeds like Good King Henry. We direct sow once in each month from November through March to find the right stratification window. In our zone 7b, mid-December was the proper sowing time to germinate Good King Henry.
Direct sow in place or sow in well drained flats. Do not use soil from your yard, it is usually compacted and hard for the seeds to break through. If necessary, screen soil through 1/4" or 1/2" hardware cloth and supplement over half with loamy compost or peat moss. Some cover their flats with plastic with holes or screens to let in snow. Make this a part of your annual winter solstice celebration. You can soak medium to larger seeds overnight to aid germination. For seeds that sink, floating seeds are not viable. Again, this varies by seed type. If seeds do not require light to germinate, sprinkle with dry soil to cover.
The harder your winter the later you can plant. If you have hard winters and it is very cold out, 30°F (0°C), put your seeds in the fridge for two weeks to reduce the shock before sowing outside.
Outdoor Treatment
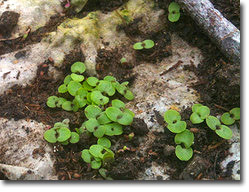 Anise Hyssop growing through the paper towel. The roots had already started growing through the towel in the bag so we just planted the paper towel and will separate as they get established. |
Snow Planting
This one is for the kids. After a heavy snow, go outside and broadcast your seeds on the snow where you want them to grow, preferably over a prepared garden bed. Have a snowball fight or toss snow over the seeds so birds do not eat them all. This method works best for varieties that can handle cold but do not require cold stratification such as hardy annuals, biennials or short lived perennials.
Surface Sowing
Keep your surface sown seeds moist until the plants are established. If direct sown seeds dry out in your climate from sun or wind, try covering with a single layer of burlap, light colored cotton sheet or half an inch of loose grass clippings. Remove burlap or sheet after germination. Shading with a window screen or white row cover above them the first season will help prevent drying in hot climates. You can also cover with clear plastic until germination to retain moisture, but be careful not to overheat. As soon as sprouts appear, again remove covering.
Some Need Light
Some seeds require light to germinate, sow these seeds on the surface and gently press into contact with the soil. Seeds requiring light to germinate will be indicated both in the growing instructions and will have a sowing depth of ’surface’.
Good growing!
Read More:
- Seed Germination Theory and Practice (PDF) by Norman C. Deno, 1993-1994.
- Seed to Seed by Suzanne Ashworth, 2002.
- Starting From Seed: The Natural Gardener’s Guide to Propagating Plants, Brooklyn Botanical Garden, 2000.
- Plant Propagation, The American Horticultural Society, 1999.
No comments:
Post a Comment
Thank you for taking the time to leave a comment on our blog - it is appreciated.